Battery switch on travel trailer function is crucial for safe and efficient power management. Understanding how your battery switch works is key to preventing electrical issues and maximizing your RV’s lifespan. This guide covers everything from basic operation to troubleshooting and safety, ensuring you’re confident handling your travel trailer’s power system.
We’ll explore different battery switch types, their wiring diagrams, and best practices for maintenance. We’ll also tackle common problems like malfunctioning switches and voltage drops, providing clear troubleshooting steps and safety tips. Whether you’re a seasoned RVer or a newbie, this guide will empower you to confidently manage your travel trailer’s power.
Understanding Battery Switch Functionality in Travel Trailers: Battery Switch On Travel Trailer Function
Your travel trailer’s battery switch is a crucial component, controlling the flow of power between your trailer’s batteries and its electrical systems. Understanding how it works is essential for safe and efficient RVing. This section will delve into the different types of switches, their wiring, operation, and a comparison of their advantages and disadvantages.
So, you’re gearing up for that awesome travel trailer adventure? First things first: understand your power! Knowing how to use the battery switch on travel trailer function is key to avoiding dead batteries and keeping your lights on. Then, before you hit the road, don’t forget to sort out your travel insurance! Check out Aon travel insurance for options; peace of mind is priceless, especially when exploring new places.
Types of Battery Switches Used in Travel Trailers
Several types of battery switches manage power in travel trailers. The most common are simple on/off switches, dual battery switches, and battery isolators. Simple on/off switches are the most basic, offering only the ability to connect or disconnect the battery from the trailer’s electrical system. Dual battery switches allow you to select between two batteries (typically a house battery and a starting battery for the tow vehicle) or to connect both to the trailer’s system.
Battery isolators, often used in conjunction with solar panels or alternators, automatically manage the charging and discharging of multiple batteries, preventing overcharging or draining.
Typical Wiring Diagram for a Battery Switch System
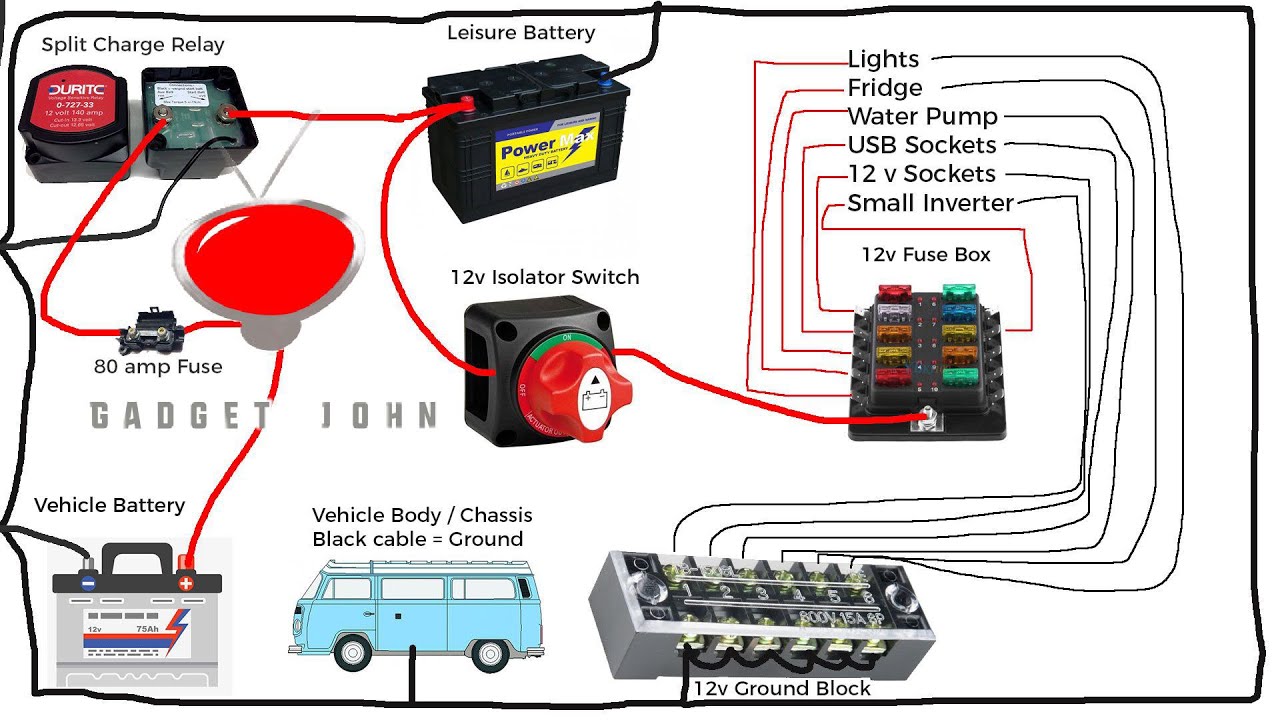
A typical dual battery switch system involves a main power source (the batteries), a battery switch, and the trailer’s electrical system. The positive (+) cable from each battery connects to the switch’s input terminals. The switch’s output terminal then connects to the positive (+) bus bar of the trailer’s electrical system. The negative (-) cables from each battery connect directly to the trailer’s chassis, creating a ground.
This setup allows the user to select which battery powers the trailer or both. A more complex system might incorporate an isolator, which would sit between the batteries and the switch, managing charging currents automatically. Imagine a diagram where two batteries are represented by circles, labeled “Battery 1” and “Battery 2”. Lines represent wires, connecting the batteries to a rectangular box labeled “Battery Switch”, which in turn connects to another rectangular box representing the “Trailer Electrical System”.
A final line shows the negative terminals connected directly to the ground.
Operating a Battery Switch
Operating a battery switch is generally straightforward. For a simple on/off switch, simply flip the switch to the “on” position to connect the battery to the trailer’s system, and to the “off” position to disconnect it. Dual battery switches typically have multiple positions. One position will connect only the starting battery, another will connect only the house battery, a third position will connect both, and a fourth will disconnect both.
Always refer to your specific switch’s instructions for exact operation, as symbols and positions can vary. Before working with any electrical components, always disconnect the negative (-) battery cable to prevent accidental shorts.
Comparison of Battery Switch Types
| Battery Switch Type | Advantages | Disadvantages | Cost |
|---|---|---|---|
| Simple On/Off Switch | Simple, inexpensive | Only controls one battery, no battery selection | Low |
| Dual Battery Switch | Allows selection between two batteries or both, relatively inexpensive | Manual operation only | Medium |
| Battery Isolator | Automatic charging and discharging management, prevents overcharging/draining | More complex, potentially more expensive | High |
Troubleshooting Common Battery Switch Issues
Dealing with a faulty battery switch in your travel trailer can be frustrating, but systematic troubleshooting can often pinpoint the problem. Understanding the common issues and how to address them will save you time and potential headaches. This section will guide you through diagnosing and resolving some typical problems.
Common Battery Switch Malfunctions
Several issues can cause your battery switch to malfunction. These include corroded connections, loose wiring, a faulty switch itself, or even problems within the battery system. Identifying the root cause is crucial for effective repair. A simple visual inspection can often reveal obvious problems like loose or corroded connections. However, more in-depth checks may be needed for internal switch failures.
Troubleshooting a Battery Switch Failing to Connect
If your battery switch isn’t connecting, start by visually inspecting all connections. Look for corrosion on the terminals or loose wires. Clean any corrosion with a wire brush and baking soda solution, then reconnect securely. If the problem persists, check the switch itself for any signs of damage or internal breakage. A multimeter can test the continuity of the switch to confirm whether it’s functioning correctly.
If the switch is faulty, it will need to be replaced. Remember to disconnect the battery before performing any electrical work.
Diagnosing Excessive Voltage Drop Across a Battery Switch
An excessive voltage drop across the battery switch indicates a problem with the connection or the switch itself. Use a multimeter to measure the voltage at both sides of the switch when the load is on (e.g., lights, appliances). A significant voltage difference (more than 0.5 volts) points to a poor connection. Clean and tighten all connections.
If the voltage drop remains high after cleaning and tightening, the switch may be faulty and require replacement. High resistance within the switch itself can also cause this problem.
Troubleshooting Flowchart for a Non-Functional Battery Switch
Imagine a flowchart with the following steps:
1. Start
Begin the troubleshooting process.
2. Visual Inspection
Check for loose wires, corrosion, or visible damage to the switch and connections. If issues are found, proceed to step 3a. Otherwise, proceed to step
4. 3.a Clean and Tighten
Clean corroded connections and tighten loose wires. Test the switch. If it works, the process is complete. If not, proceed to step 3b.
3.b Replace Switch
If cleaning and tightening doesn’t resolve the issue, replace the battery switch. The process is complete.
So, you’re prepping for your awesome travel trailer adventure? First things first: understand your power! Knowing how to use the battery switch on travel trailer function is crucial for keeping your lights and appliances running. Then, don’t forget to sort out your insurance! Getting Aon travel insurance beforehand will give you peace of mind, ensuring you’re covered for any unexpected hiccups along the way.
Happy travels!
4. Continuity Test
Use a multimeter to check the continuity of the switch. If continuity is good, proceed to step 5. If not, proceed to step 3b.
5. Voltage Drop Test
Measure voltage drop across the switch under load. If voltage drop is excessive, proceed to step 3a. Otherwise, investigate other components in the electrical system. The process is complete.
Battery Switch and Power Management
Your travel trailer’s battery switch is the central nervous system of your electrical system, controlling the flow of power between your batteries and the various appliances and systems in your RV. Understanding its role is crucial for preventing damage and ensuring a smooth, reliable power supply.The battery switch acts as a gatekeeper, selectively directing power from your house batteries (typically 12V DC) to different parts of your trailer.
It allows you to isolate your batteries completely, preventing drain when the trailer is stored, or to connect them to your trailer’s systems, charging systems, and potentially even your vehicle’s charging system. This control is vital for preventing accidental battery drain and ensuring efficient power management.
Battery Switch Interactions with Other Electrical Components
The battery switch directly impacts the operation of several key electrical components. The converter, for instance, draws power from the batteries to convert 12V DC to 120V AC for household appliances. An improperly configured battery switch can prevent the converter from functioning correctly, leading to power outages for your lights, outlets, and other AC-powered devices. Similarly, the inverter, which converts 12V DC to 120V AC, relies on a properly functioning battery switch to access the necessary power source.
If the switch is in the wrong position, the inverter will not have power, rendering it useless. A common scenario is when the switch is accidentally left in the “off” position, causing the refrigerator to shut down, leading to spoiled food.
Examples of Incorrect Battery Switch Usage and System Damage
Leaving the battery switch in the “on” position while the trailer is in storage can lead to a completely drained battery, potentially causing permanent damage due to deep discharge. This can require a costly battery replacement. Conversely, accidentally turning off the switch while using high-power appliances like an air conditioner or microwave can cause a sudden power cut, potentially damaging sensitive electronics.
In another scenario, leaving the switch in the wrong position while charging the batteries from shore power might prevent the batteries from charging correctly, shortening their lifespan.
Best Practices for Maintaining the Battery Switch
Proper maintenance of your battery switch is essential for its longevity and the reliable operation of your entire electrical system.
Regularly inspect the switch for any signs of corrosion, loose connections, or damage. Clean any corrosion using a wire brush and baking soda paste. Tighten any loose connections to ensure a secure electrical contact.
Periodically, operate the switch through its various positions to ensure smooth and reliable operation. This helps prevent sticking or seizing of the switch mechanism.
Consider using a battery switch with a built-in disconnect switch. This provides an additional layer of safety and allows you to easily isolate your batteries in case of emergencies or during prolonged storage.
When not in use for extended periods, it’s best practice to turn the battery switch to the “off” position to prevent parasitic drain on the batteries.
Safety Considerations with Battery Switches
Working with your travel trailer’s battery system requires careful attention to safety. Improper handling can lead to serious injury from electrical shock, burns, or even explosions from the battery itself. Understanding and following safety procedures is crucial for preventing accidents and ensuring a safe and enjoyable camping experience.Understanding the potential hazards is the first step towards safe battery handling.
Lead-acid batteries, commonly found in travel trailers, produce hydrogen gas during charging and discharging. This gas is highly flammable and can ignite with a spark, causing an explosion. Furthermore, battery acid is corrosive and can cause severe burns upon contact with skin or eyes. Electrical components within the battery switch system also carry significant voltage that can cause serious injury if mishandled.
Safe Disconnection Procedures
Disconnecting the battery switch should always be performed with care. Before starting any work, ensure the trailer is parked on a level surface, away from any flammable materials. Always wear appropriate safety gear, including safety glasses and gloves. Begin by turning off any appliances or electronics connected to the battery system. Then, firmly but gently turn the battery switch to the “off” position.
After disconnecting the switch, visually confirm that the connection is broken and no power is present. This is an important final safety check to ensure you’re working on a truly de-energized system.
Safety Tips for Handling Batteries and Electrical Components, Battery switch on travel trailer function
Proper handling of batteries and electrical components is paramount for your safety. Here are some essential safety tips to keep in mind:
- Always wear safety glasses and gloves when working with batteries or electrical components.
- Ensure adequate ventilation when working near batteries to avoid the buildup of flammable hydrogen gas.
- Never allow tools or metal objects to short circuit across the battery terminals.
- Keep sparks, open flames, and cigarettes away from batteries.
- Use insulated tools to avoid accidental electrical shocks.
- Never work on electrical components while they are energized. Always disconnect the power source first.
- If you are unsure about any aspect of working with your travel trailer’s electrical system, consult a qualified technician.
- Store batteries in a cool, dry, and well-ventilated area away from children and pets.
- Check battery terminals regularly for corrosion and clean them as needed using a wire brush and baking soda solution. Remember to always disconnect the battery before cleaning.
- Dispose of used batteries properly according to local regulations. Never throw them in the trash.
Types of Batteries Used with Travel Trailer Battery Switches
Choosing the right battery for your travel trailer is crucial for reliable power and a long lifespan. The type of battery you select will directly influence your battery switch’s performance and longevity. This section details the common battery types and their compatibility with various battery switch systems.
Travel trailers typically use either lead-acid or lithium-ion batteries. Each has its advantages and disadvantages, impacting both the power supply and the demands placed on your battery switch.
Lead-Acid Battery Characteristics
Lead-acid batteries are the traditional choice for many RVs and travel trailers due to their relatively low cost and wide availability. However, they are heavier than lithium-ion batteries and have a shorter lifespan. There are two main types of lead-acid batteries: flooded and absorbed glass mat (AGM). Flooded lead-acid batteries require regular maintenance, including checking and topping off the electrolyte levels.
AGM batteries are sealed and maintenance-free, making them a more convenient option. Both types are generally compatible with most standard battery switches, but high amperage draws can stress older switches.
Lithium-Ion Battery Characteristics
Lithium-ion batteries are becoming increasingly popular in travel trailers due to their lightweight nature, longer lifespan, and higher energy density. They offer significantly more power for their size and weight compared to lead-acid batteries. However, they are more expensive upfront. Lithium batteries often require specific charging profiles and battery management systems (BMS) which can impact compatibility with some older battery switches.
Some switches might not be able to handle the higher voltage or current demands of a lithium setup and may require upgrading.
Battery Type Impact on Battery Switch Performance
The type of battery directly affects the performance and lifespan of your battery switch. Lead-acid batteries, especially flooded ones, can produce more gassing and corrosion, potentially leading to faster wear on the switch’s contacts. The higher current demands of larger lithium batteries can also stress a battery switch if it isn’t rated for the amperage. A switch designed for lower amperage lead-acid batteries may overheat or fail prematurely when used with a high-capacity lithium battery.
Conversely, a heavy-duty switch designed for high-current lithium batteries will likely work well with lead-acid batteries, although it might be overkill.
Comparison of Battery Types for Travel Trailers
| Characteristic | Flooded Lead-Acid | AGM Lead-Acid | Lithium-Ion |
|---|---|---|---|
| Cost | Low | Medium | High |
| Weight | High | Medium | Low |
| Lifespan | Short (3-5 years) | Medium (5-7 years) | Long (8-10+ years) |
| Maintenance | High | Low | Low |
| Energy Density | Low | Medium | High |
| Charging Requirements | Simple | Simple | More complex, often requires BMS |
Mastering your travel trailer’s battery switch isn’t just about convenience; it’s about safety and extending the life of your RV’s electrical system. By understanding the different types of switches, troubleshooting common issues, and following safety precautions, you’ll be well-equipped to handle any power situation on the road. Remember, regular maintenance and safe operation are key to a smooth and enjoyable RV experience.
Questions and Answers
What happens if I leave my battery switch in the “off” position?
Leaving the switch off completely disconnects your house batteries from the rest of your RV’s electrical system. This prevents parasitic drain but means no power to appliances or lights.
Can I use a lithium battery with any battery switch?
Not necessarily. Some battery switches aren’t designed for the higher voltage and current demands of lithium batteries. Check your switch’s specifications and consult the manufacturer before using lithium batteries.
How often should I inspect my battery switch?
Regular visual inspections are recommended, at least once a year or before each major trip. Look for corrosion, loose connections, or any signs of damage.
My battery switch is making a clicking noise. What’s wrong?
A clicking noise often indicates a problem with the switch itself, or a low battery voltage. Check your battery voltage and if it’s low, charge it. If the clicking persists, the switch might need replacement.
